Joint Health and Hiking: Pain-Free Miles on Every Trail
Practical training, gear, and nutrition to keep hikers’ joints strong on day hikes and thru-trails.
Trail-Ready Joints: Training That Protects Every Step
Strength Basics for Joint Health and Hiking
Strong muscles act like shock absorbers, protecting cartilage and ligaments on every climb and descent. To support joint health and hiking, prioritize compound moves such as split squats, step-ups, and hip hinges two to three times per week. Start with bodyweight, then add a pack or dumbbells as control improves and pain stays at zero during and after. Keep reps moderate and tempo steady so joints experience smooth, predictable loading rather than jerky strain. Track how your knees and hips feel 24 hours later to calibrate volume without guesswork.
Pair lower-body work with core and glute strength to stabilize the pelvis and reduce torsion at the knees. Side planks, bird dogs, and glute bridges create a solid platform so ankles and knees don't compensate on uneven ground. Training blocks of six to eight weeks let tissues adapt; small, consistent increases beat sporadic hero sessions. If pain appears, reduce range of motion, offload with support, or split volume across more sessions. These adjustments keep progress moving without sacrificing joint longevity.
Mobility and Warm-Ups for the Trail
Before the first step, prime ankles, hips, and thoracic spine to move freely under load. A five-minute sequence of calf rocks, ankle circles, hip openers, and thoracic rotations prepares connective tissue and reduces early-hike stiffness. Dynamic movements beat long static stretches pre-hike because they increase blood flow and joint lubrication without dampening strength. On cold mornings, add light marching and mini band walks to wake up stabilizers. The goal is smooth, pain-free motion, not contortionist flexibility.
During rest stops, micro-mobility resets keep joints happy as miles stack up. Two or three rounds of gentle knee flexion-extensions and ankle pumps restore glide after long descents. This is also the perfect time to practice trail-friendly joint exercises using bodyweight and bands. Short, frequent tune-ups prevent the accumulation of tension that becomes soreness at camp. Finish each day with easy-range stretches and deep breathing to kickstart recovery while you refuel.
Balance and Stability Drills
Single-leg balance teaches your feet, ankles, and hips to respond quickly to roots, rocks, and ruts. Practice barefoot or in hiking shoes on firm ground, then progress to foam pads or uneven surfaces. Add light head turns or pole taps to challenge stability while keeping posture tall and knees soft. These drills reduce overreactions that twist joints and cause next-day aches. Five focused minutes, three times weekly, builds a noticeable buffer against missteps.
Stability isn't just standing still; it's managing controlled motion through space. Step-downs from a low box mimic downhill braking, while lateral step-overs prepare you for narrow switchbacks. Keep your knee tracking over your second toe and land softly to protect cartilage. Integrating these into a hiking knee pain prevention routine compounds benefits over time. The payoff shows up on long descents when your legs still feel responsive and steady.
Smart Gear Choices that Ease Impact
Footwear and Insoles that Cushion Without Compromise
Your shoes set the tone for every joint up the chain, from toes to spine. Choose hiking footwear with a stable heel counter, moderate rocker, and enough midsole cushioning to diffuse impact without feeling marshy. Try on late in the day with hiking socks to match real-world foot volume, and test uphill and downhill on a ramp if possible. If arches tire or knees complain, a supportive insole can improve alignment and pressure distribution. Replace shoes or insoles when tread and foam stop rebounding; tired gear makes joints work overtime.
Match lug pattern and rubber to the terrain you hike most, not the gnarliest trail on social media. Slipping forces sudden, awkward loads through knees and hips that no training plan can fully offset. For long days on mixed terrain, a balanced outsole with secure heel braking and flexible forefoot helps maintain natural gait. Keep laces snug around the midfoot to limit sliding on descents. Small fit tweaks pay large dividends in comfort and protection.
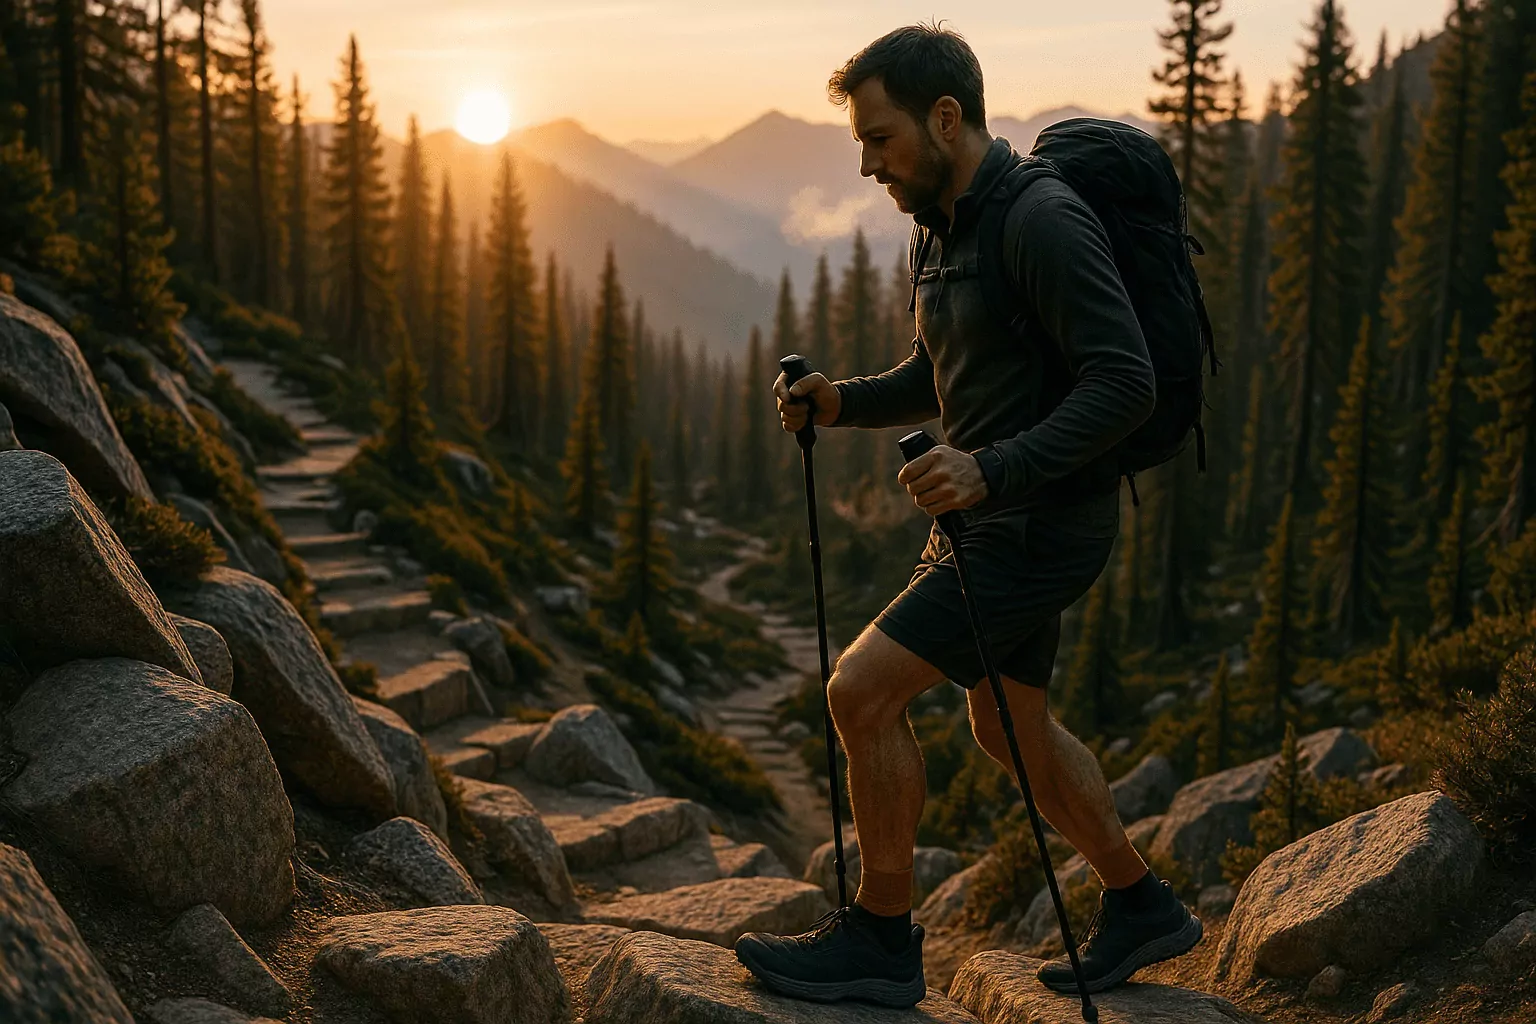
Best Trekking Poles for Joints: What to Look For
The best trekking poles for joints shift load from knees and ankles to your upper body, especially on descents. Prioritize adjustable length with quick locks, ergonomic grips, and reliable tips that bite into dirt and rock. Aluminum shafts are slightly heavier but often more durable; carbon saves weight for high-mileage days. Set pole length so elbows rest near 90 degrees on flat ground, then lengthen slightly for downhills. Used well, the best trekking poles for joints can cut perceived knee strain significantly.
Make pole plants rhythmical and light, not stabs that jam wrists or shoulders. On steep drops, plant poles just ahead and slightly wider than your feet to create a stable triangle. In mud or snow, baskets prevent sinking and protect joint alignment by keeping your balance predictable. Practice technique on easy trails before you need it in exposure or fatigue. Pair poles with low-impact hiking tips to compound impact reduction across varied terrain.
Packs, Fit, and Load Management
Pack weight and fit directly affect stride mechanics and knee loading. Keep base weight realistic for the trip length, terrain, and weather, trimming redundancies without sacrificing safety. A well-fitted hip belt carries most of the load on your pelvis, sparing lumbar discs and knees. Adjust shoulder straps, load lifters, and sternum strap so the pack hugs without compressing your chest. Recheck fit after the first mile as layers shift and water weight changes.
Balance your pack so heavy items ride close to your spine and between your shoulders. Lopsided loads force subtle compensations that add up over miles. If joints start to nag, redistribute weight, shorten stride, and take a brief reset. Combining smart packing with hiking knee pain prevention strategies keeps discomfort from snowballing. Efficiency here means more energy for scenery and less for fighting friction.
Trail Tactics: How to Hike with Less Joint Stress
Low-Impact Hiking Tips for Any Elevation
Technique multiplies the value of your training and gear. Adopt a slightly shorter stride with quicker cadence to reduce braking forces at the knee. Keep your center of mass over your feet on descents, hinging at the hips instead of collapsing through the quads. Choose lines that smooth out abrupt steps, even if they add a few extra micro-moves. These low-impact hiking tips save cartilage today and preserve stoke for tomorrow's trail.
On climbs, drive through hips and glutes rather than yanking with the back or overstriding. Use poles to share the work and keep rhythm when switchbacks pitch up. If the trail is chattery, soften knees and ankles like springs to absorb the chatter. Revisit low-impact hiking tips during breaks to stay mindful when fatigue sets in. Small, consistent cues keep joints in their safest range under load.
Hydration, Recovery, and Soreness Signals
Hydration supports joint lubrication and tissue resilience, especially in heat or altitude. Aim for steady sipping and include electrolytes on longer or sweatier days to protect muscle function. Recovery starts the moment you stop: change into dry layers, elevate legs, and eat a protein-carb snack within an hour. Gentle evening mobility and breathing help downshift your nervous system for deeper sleep and faster repair. When soreness lingers beyond 48 hours or localizes sharply, reduce intensity until it normalizes.
Pain that sharpens with each step, wakes you at night, or alters your gait deserves attention. Treat early with rest, ice or heat as tolerated, and gradual return to load rather than pushing through. Keep a quick log of mileage, elevation, shoes, and how joints felt the next day. Patterns reveal what drives flare-ups and what calms them. Over time, this becomes your personalized hiking knee pain prevention dashboard.
When to Modify or Turn Back
Good judgment protects joints better than any single tool. If weather, footing, or fatigue erodes your form, shorten the route or slow the pace. Use turnaround times and bail-out options baked into your plan so decisions are easy, not emotional. Prioritize even footfalls and posture over summit fever; safe mechanics beat risky milestones. The mountain will be there tomorrow, and your knees will thank you next season.
Modifications can be simple and effective. Swap a steep descent for a gentler spur, or add rest intervals before knees get noisy. Lighten the pack by stashing water at known points or sharing group gear. Pair these choices with trail-friendly joint exercises at breaks to reset support muscles. Practical flexibility builds a long, happy relationship between joint health and hiking.
Nutrition That Feeds Resilient Cartilage
Joint Support Nutrition for Hikers: Daily Staples
Fuel choices influence inflammation, tissue repair, and day-to-day comfort on the trail. Center meals on lean proteins, colorful produce, whole grains, nuts, and olive oil to supply amino acids, antioxidants, and healthy fats. Omega-3 sources like salmon, trout, walnuts, and flax may help temper excessive inflammatory signals after big days. Stay consistent: the best joint support nutrition for hikers works through daily habits, not one-off superfoods. Hydrate well to keep cartilage bathed and pliable.
Plan trail menus with the same care you give route planning. Distribute protein across the day to support muscle retention during high mileage. Include calcium and vitamin D from dairy or fortified alternatives to back strong bones. Add magnesium- and potassium-rich foods to reduce cramping and boost recovery. Over weeks, joint support nutrition for hikers can reduce soreness spikes and support steadier strides.
Supplements with Evidence and Caveats
Some supplements show modest benefits when layered onto solid diet and training. Omega-3 fish oil, curcumin with black pepper, and collagen taken with vitamin C before loading may support joint comfort. Glucosamine-chondroitin helps some people, though results vary and require patience to gauge. Always check for interactions, quality testing, and appropriate dosing, especially if you take medications. Supplements complement, not replace, sleep, strength, and technique.
Trial changes one at a time for three to six weeks to judge effect honestly. Keep notes on pain levels, stiffness, and daily mileage to separate real improvements from placebo. If a product upsets your stomach or sleep, discontinue and reassess. Budget also matters; prioritize proven basics like training and footwear before expensive pills. A measured approach keeps expectations realistic and results trackable.
Trail Snacks that Fight Inflammation
Snacks can pull double duty by fueling miles and supporting joint comfort. Mix complex carbs with protein and anti-inflammatory fats to smooth energy and recovery. Think tuna packs with olive-oil crackers, nut-and-seed mixes, or hummus wraps with greens. Dried tart cherries, oranges, and ginger chews offer flavor with potential joint-friendly benefits. Rotate options so you actually enjoy what you pack and eat enough.
For long pushes, schedule snack breaks before you feel drained. Consistent fueling helps maintain form, keeping knees aligned and cadence snappy. Combine snacks with a minute of ankle pumps and calf rocks to refresh joints. This simple pairing embodies low-effort, high-return hiking knee pain prevention. Over a season, these micro-strategies add up to fewer flare-ups.
Prehab and Rehab: Keep Moving Without Overdoing It
Hiking Knee Pain Prevention Plan
A structured plan makes protection proactive instead of reactive. Weekly strength, mobility, and balance work creates reserves you draw on during big days. Schedule easy, moderate, and hard weeks so tissues adapt while you still stack miles. Log symptoms and adjust variables like pack weight, terrain, or shoe choice when joints grumble. This systematic hiking knee pain prevention approach keeps progress steady and setbacks rare.
When a flare occurs, dial back to pain-free ranges and rebuild with patience. Swap hard descents for flats, and keep cadence up while reducing stride length. Ice or heat as preferred, maintain light mobility, and resume loading once walking is smooth and confident. Reassess technique and gear, including the best trekking poles for joints, before ramping up. Prevention is a loop: assess, adjust, and advance.
Trail-Friendly Joint Exercises You Can Do Anywhere
Simple, trail-friendly joint exercises fit into five-minute windows at camp, trailheads, or lunch stops. Try mini band lateral walks, glute bridges, and calf raises for two controlled sets apiece. Add ankle alphabet, gentle knee extensions, and balance holds to restore coordination. Keep tempo slow and range pain-free so tissues get stimulus without irritation. Repeating these trail-friendly joint exercises daily cements durability where you need it most.
For knee comfort, emphasize quads and hips with step-ups onto a rock or log. If downhill miles await, include eccentric step-downs with a soft landing. Practice pole-assisted single-leg sit-to-stands to blend strength and movement skill. Each rep reinforces the mechanics you'll use on uneven ground. Over time, this micro-dose strategy pairs perfectly with low-impact hiking tips for seamless protection.
Tracking Progress and Knowing When to Get Help
Measure what matters: pain scale, stiffness on first steps, and how joints feel the morning after hikes. Note mileage, elevation, footwear, and pace so you can connect dots between choices and outcomes. Improvements should trend toward lower pain at equal or higher loads across several weeks. If pain escalates, alters gait, or persists beyond two weeks despite deloading, consult a clinician. Early guidance can prevent minor irritation from becoming a season-ending issue.
Bring your log, footwear history, and videos of your gait to make the visit efficient. A tailored plan may include targeted strength, mobility, or gait tweaks you can apply immediately. Keep working your plan and revisit goals once symptoms settle. The aim is sustainable joint health and hiking, not quick fixes that fade. With clear data and smart support, most hikers return stronger than before.
Frequently Asked Questions
Should I hike if I have mild knee osteoarthritis?
Yes, many people with mild knee osteoarthritis hike successfully with the right plan. Prioritize strength training, technique, and load management to control joint stress. Choose softer surfaces, moderate grades, and routes that allow you to turn back early if needed. Use the best trekking poles for joints to share load on descents and practice low-impact hiking tips. Keep pain levels in the mild range and avoid next-day flares that last more than 24-48 hours. If swelling or sharp pain appears, pause, modify, and consult a clinician to fine-tune your approach.
Are downhill sections worse for joints than uphill?
Downhill generally increases braking forces at the knee and hip, so it often feels tougher on joints. Shorten your stride, raise cadence, and hinge at the hips to reduce that braking load. Lengthen poles slightly and plant them ahead to create a stable, shock-absorbing triangle. Footwear with reliable traction and a stable heel counter also limits slips that spike joint stress. Put hiking knee pain prevention to work by scheduling breaks before your form fades. Over time, technique plus strength makes descents far more comfortable.
What if my knees hurt only after hikes, not during?
Post-hike knee pain points to cumulative load outpacing recovery rather than an acute issue. First, reduce descent volume, lighten the pack, and slow your pace while you troubleshoot. Add extra recovery-sleep, hydration, and gentle mobility-and emphasize quads and glutes in training. Revisit gear fit and try the best trekking poles for joints to offload a bit more. Layer in joint support nutrition for hikers to help manage inflammation and tissue repair. If pain persists after two to three weeks of adjustments, seek a professional assessment.
Do I need special exercises, or will hiking alone build joint resilience?
Hiking builds endurance, but it's uneven for strength and control in key ranges of motion. Complement miles with targeted strength and trail-friendly joint exercises to protect knees, hips, and ankles. Two short sessions per week can produce big returns in comfort and confidence. Blend them with low-impact hiking tips so your technique reinforces your training. This combo is the backbone of sustainable joint health and hiking season after season. Strong, coordinated muscles keep loads predictable and cartilage happier on every terrain.