Joint Health and Hiking: Protect Your Knees on Every Trail
Actionable training, gear, and trail choices for hikers who want stronger joints and pain-free miles.
Train Smart: Build Strength and Mobility Before the Trail
Joint Health and Hiking: Trail-Friendly Exercises
Joint health and hiking go hand in hand when your muscles handle more load than your joints. Focus on trail-friendly joint exercises that build strength in the hips, knees, ankles, and feet. Prioritize movements like step-downs, split squats, calf and tibialis raises, and single-leg deadlifts to stabilize each stride. Eccentric work, such as slow step-downs, teaches your tissues to absorb downhill forces without flaring pain. Program these moves two to three times weekly to support hiking knee pain prevention before mileage climbs.
Use simple progressions: start with bodyweight, master control, then add load or range. Keep reps in the 6-12 range for strength and 12-20 for endurance, rotating phases every 4-6 weeks. Include isometrics like wall sits and calf holds to build tendon robustness with low irritation. Balance drills-single-leg stands with eyes forward or on a pillow-sharpen ankle reactions for rocky terrain. Log sessions just like hikes so your increases are planned, steady, and sustainable.
Mobility and Warm-Up Routines for Joint Health
Dynamic mobility primes tissues so joints glide without grinding. Address ankle dorsiflexion, hip rotation, and thoracic rotation to stack your stride efficiently. Use controlled articular rotations for ankles and hips, then add walking lunges, leg swings, and deep squats with support. A dedicated 8-12 minute warm-up reduces stiffness and sharpens proprioception before steep or uneven sections. Consistent preparation is a quiet cornerstone of hiking knee pain prevention on long days.
On trail, insert micro-mobility breaks when terrain changes or fatigue sets in. Thirty seconds of ankle rocks, hamstring sweeps, and hip openers can restore efficient mechanics mid-hike. Keep joints warm during pauses with light movement rather than full stops in cold wind. If you use poles, practice shoulder blade setting to avoid neck and shoulder tension. Finish the hike with a brief cool-down walk to signal recovery, not shutdown.
Progressive Training Plans for Load Tolerance
Your joints thrive on gradually increased, predictable stress. Build a weekly plan that blends strength days, shorter hikes, and a single longer outing, keeping total elevation and pack weight in view. Increase one variable at a time-distance, elevation, or load-by roughly 5-10 percent weekly. Hold every third or fourth week as a deload to consolidate gains and clear minor niggles. This structure builds resilience that pays off on ascents, descents, and uneven ground.
Use stairs, hill repeats, or treadmill inclines to simulate climbs when trails are scarce. Track how your knees and hips feel 24-48 hours later, and adjust before bumping volume. Pair big descent days with eccentric strength sessions earlier in the week for carryover. If soreness lingers beyond two days or swells, scale back and retest your baseline. A smart progression is more powerful for joint health and hiking longevity than any single hero workout.
Move Efficiently: Technique and Pace That Protect Joints
Joint Health and Hiking: Technique Essentials on Steep Terrain
Shorten your steps and raise cadence to lessen braking forces on steep grades. Keep your center of mass over your feet, leaning slightly from the ankles rather than bending at the waist. Aim for quiet footfalls and even pressure through the midfoot to avoid jamming the knee. Zigzagging on very steep slopes moderates gradient stress and smooths loading. These cues combine into reliable hiking knee pain prevention without slowing your overall pace.
On climbs, drive from hips and glutes while keeping the chest open for easier breathing. On descents, stay tall, soften knees, and let heels kiss the ground rather than slam. Scan three to five steps ahead to pick stable placements and reduce sudden twists. Match breathing rhythm to cadence to prevent tension from creeping into the stride. Practice these patterns on gentle hills, then apply them when it matters most.
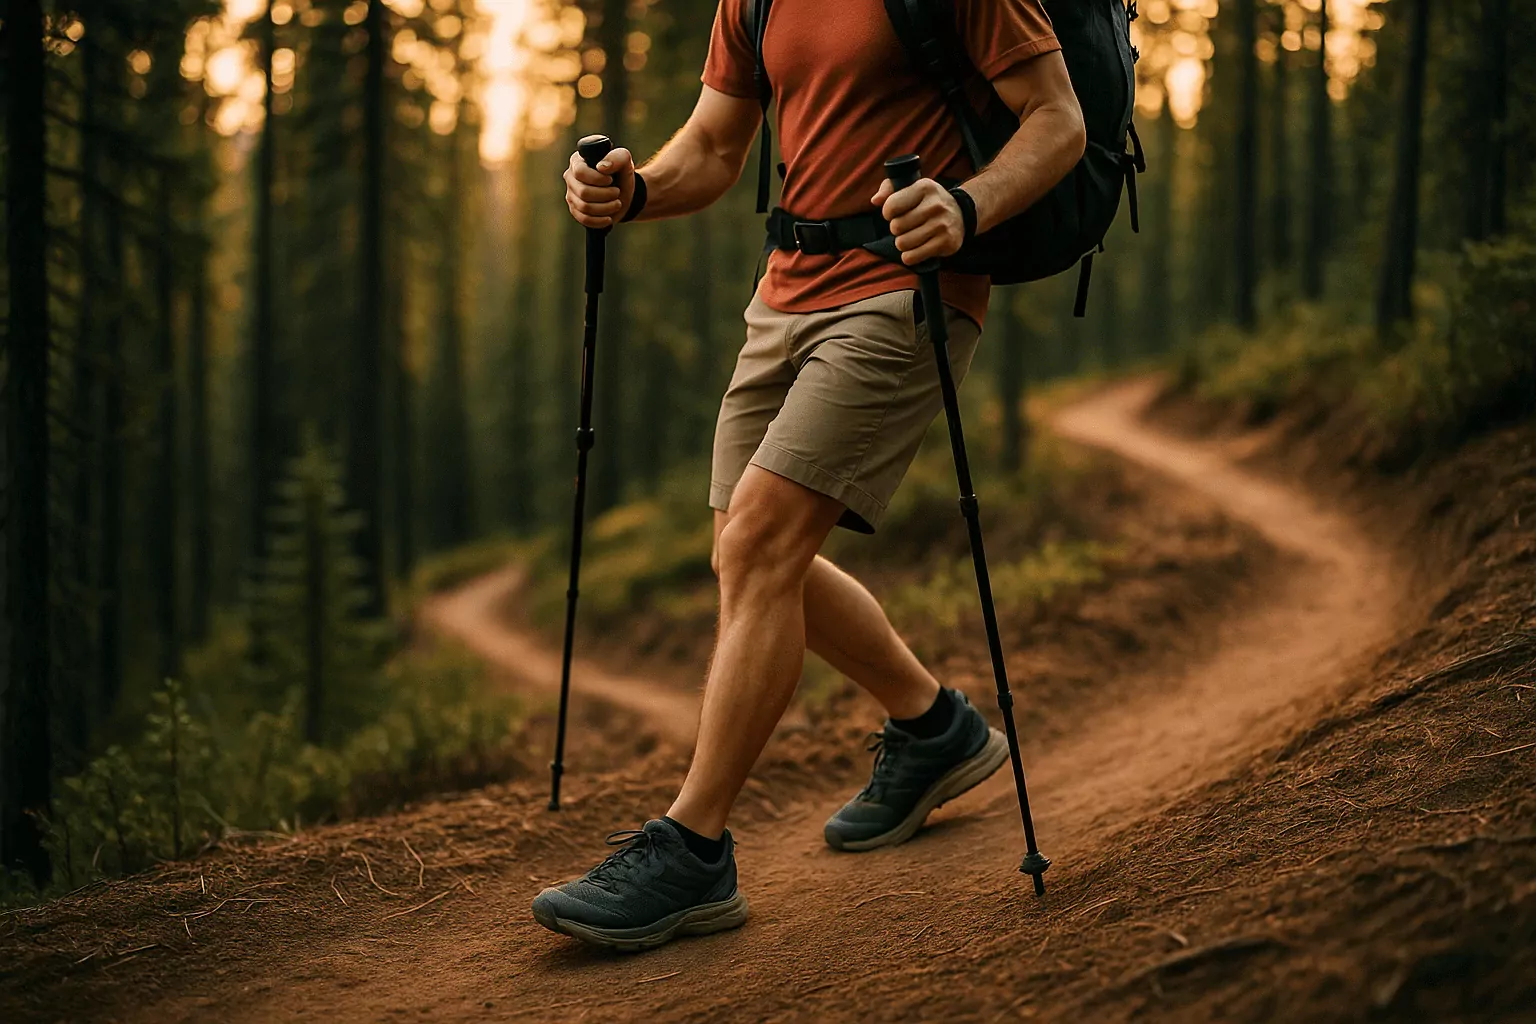
Trekking Poles Benefits for Knees and Hips
Properly used poles act like a second pair of legs, shifting load from knees to arms and trunk. Set pole length so elbows sit near 90 degrees on flats and shorten slightly for climbs. Plant poles just ahead of the feet and apply light downward pressure to reduce impact at contact. On descents, alternate plants with the opposite foot to create a steady four-beat pattern. Many hikers feel immediate relief, a hallmark example of trekking poles benefits in action.
Poles also improve balance on loose rock, stream crossings, and snow, cutting slips that strain joints. Wrist straps should cradle the hand from below so you can relax your grip. Carbide tips bite into dirt and ice, while rubber caps protect rock and wood structures. Foldable, lightweight models reduce arm fatigue and pack easily when terrain smooths out. For joint health and hiking on long descents, poles are low-effort insurance.
Low-Impact Trails Strategy for Safe Descents
Choosing terrain wisely is one of the easiest wins for your joints. Seek low-impact trails with packed dirt, pine duff, or grass shoulders rather than endless rock steps. Break steep descents into switchbacks when possible and avoid straight-line shortcuts. If a section is choppy, slow slightly and turn your toes slightly outward to widen your base. These small choices add up to meaningful hiking knee pain prevention over months of mileage.
Time your breaks at flatter stretches so you restart without sudden downhill jolts. When surfaces are wet or scree-filled, shorten steps further and keep poles ready. If knees flare, swap the descent route for a gentler ridge or service road to spare cartilage. Build a mental map of "easy exit" options before you start long loops. Low-impact trails are a strategic tool, not a concession.
Gear That Cushions Impact and Supports Alignment
Footwear Fit, Cushioning, and Rocker Profiles
Shoes are your first line of shock absorption on rough miles. Choose a secure heel, ample toe box width, and midfoot hold so your foot doesn't slide and torque the knee. Match cushioning and stack height to your body weight, terrain, and pace, aiming for stable softness rather than marshmallow. Rocker profiles smooth toe-off and reduce forefoot strain on long days. Test on stairs and slopes to confirm comfort under load before committing to big outings.
Consider moderate heel-to-toe drop if calves or Achilles are tight, and lower drops if you're well-conditioned. Insoles can fine-tune arch support but should not mask poor fit or worn foam. Rotate pairs to let midsoles rebound fully between hikes, preserving shock absorption. Replace shoes when lugs flatten and foam creases, typically every 300-500 trail miles. For joint health and hiking across mixed surfaces, the right shoe is a performance multiplier.
Bracing, Taping, and Smart Pack Weight Distribution
Light, flexible knee sleeves can enhance warmth and awareness without restricting motion. Patellar straps sometimes ease tendon hotspots, while kinesiology tape can cue better tracking when applied well. If you use supports, pair them with strength work rather than depending on them alone. For packs, keep total weight reasonable-often no more than 20-25 percent of bodyweight for most hikers. A supportive hip belt and snug shoulder straps shift load away from delicate knee joints.
Pack dense items close to your spine and mid-back height to reduce forward pitch. Use load lifter straps to fine-tune balance on climbs and descents. Distribute side-to-side mass evenly so each knee handles similar forces across the day. Recheck fit after shedding layers or water to keep alignment steady. These small adjustments deliver outsized protection on uneven ground.
Trail Surface Choices and Shock Absorption
Surface texture dictates impact more than grade alone. Hard rock and sunbaked clay transmit shocks, while duff and loam cushion each step. On out-and-backs, consider ascending rockier lines and descending softer connectors for joint relief. When routes force hard surfaces, increase cadence slightly and lean on trekking poles benefits to share load. Align footwear choice with expected surfaces to maximize comfort and control.
Urban access hikes often include asphalt connectors that can irritate knees by day's end. If possible, move to grass verges or gravel shoulders for a few minutes each mile. Mix surfaces intentionally on training days to build tolerance without overload. Keep notes on which combinations feel best so future planning gets easier. Low-impact trails are a standing option whenever recovery needs priority.
Recover Well: Habits That Keep You Hiking for Years
Post-Hike Rituals to Reduce Inflammation and Aid Repair
Recovery begins with the final mile, not the couch. Ease down intensity with five to ten minutes of relaxed walking to clear metabolites. Follow with gentle mobility for hips, knees, and ankles to maintain range while tissues cool. Compression and elevation can limit swelling after hard descents or long mileage. Prioritize seven to nine hours of sleep to consolidate strength gains and joint adaptations.
Cold water or contrast showers may blunt soreness, but don't use them immediately after key strength sessions if you want maximum training effect. Hydrate steadily and include electrolytes if the day was hot or high altitude. If a specific area feels irritated, try short bouts of light isometrics to calm it. Track next-day stiffness and adjust upcoming effort rather than powering through. Small, consistent rituals turn into durable joint health and hiking momentum.
Nutrition for Cartilage, Tendons, and Overall Joint Health
Fuel joints like you fuel mileage. Aim for 1.6-2.2 grams of protein per kilogram of bodyweight to support tissue repair on training weeks. A scoop of collagen or gelatin with vitamin C 30-60 minutes before strength or hiking may support tendons and cartilage. Add omega-3 sources and polyphenol-rich foods to help manage exercise-driven inflammation. Steady carbs before and during long hikes protect connective tissues by sparing form breakdown under fatigue.
Hydration matters for synovial fluid and disc health, so drink regularly rather than chugging once thirsty. Use salty snacks or electrolyte mixes on hot, sweaty climbs to maintain muscle firing and stride mechanics. Post-hike, pair protein with carbs within two hours to kickstart recovery. Keep a simple, repeatable plan so fueling isn't a guessing game. Nutrition is a quiet ally for joint health and hiking across seasons.
Arthritis-Friendly Hiking: When to Push and When to Pause
Pain that warms up and eases with movement often signals tolerance, while sharp, escalating pain calls for backing off. Use a 0-10 scale and keep effort in the 0-3 range during flares, progressing when symptoms settle within 24 hours. Favor softer surfaces and low-impact trails on sore days, and shorten descents with poles. Strength and mobility still matter; just trim volume and avoid long holds in deep flexion. This approach supports arthritis-friendly hiking without sidelining your season.
Red flags such as night pain, joint locking, or swelling that persists for days deserve clinical input. Track what changes-new shoes, extra elevation, cold temps-and adjust one lever at a time. Build a "fallback" loop you can shorten if symptoms rise mid-hike. Pair careful terrain choices with trekking poles benefits to smooth forces when joints are irritable. Smart pacing is the heart of hiking knee pain prevention when arthritis is in the mix.
Frequently Asked Questions
What shoes are best for joint health and hiking on mixed terrain?
Look for a secure heel, roomy toe box, and midfoot lock so your foot doesn't slide and twist the knee. Choose stable cushioning with enough stack to blunt rocks without feeling wobbly under load. Rocker soles can smooth toe-off and reduce forefoot strain on long approaches. Moderate heel-to-toe drop often suits tight calves, while lower drops work if you're conditioned and mobile. Test on stairs and slopes with your typical pack weight before committing. Replace pairs when foam flattens and lugs smooth, usually between 300-500 trail miles. The best shoe is the one that keeps your stride quiet and aligned across your usual surfaces.
How can I train at home for hiking knee pain prevention?
Anchor your plan with step-downs, split squats, calf and tibialis raises, and wall sits two to three times weekly. Start with slow eccentrics and isometrics to build tolerance, then add load as control improves. Include ankle and hip CARs, walking lunges, and leg swings to keep joints moving freely. On non-strength days, walk briskly with short steps and higher cadence to rehearse efficient mechanics. Add light stairs or incline treadmill sessions to prepare for climbs and descents. Track soreness 24-48 hours after training and adjust volume before increasing again. Consistent, simple work beats sporadic, heroic sessions for joint health and hiking longevity.
Are trekking poles necessary or just nice to have?
While not mandatory, poles meaningfully reduce knee load on descents and improve balance on unstable ground. Set length to keep elbows near 90 degrees on flats, shorten for climbs, and lengthen slightly for steep downs. Learn an opposite-foot plant to create a steady rhythm that shares impact with your upper body. Poles become close to essential with heavy packs, long downhills, snow, or scree. Lightweight, foldable models with secure straps minimize hand fatigue over hours. Rubber caps protect rock and wood structures, while bare tips grip dirt and ice. For many hikers, the practical trekking poles benefits feel obvious within the first mile.